


Open-Source, DIY Seed Cleaner Plans
Released for the benefit of small independent seed producers.
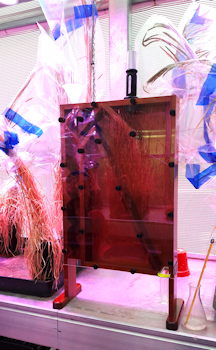
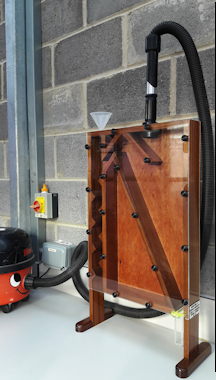
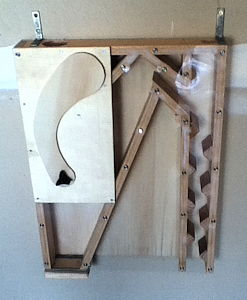
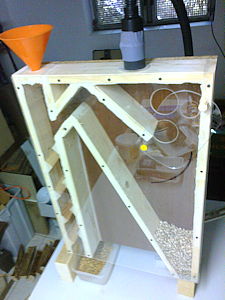
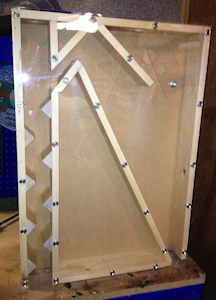
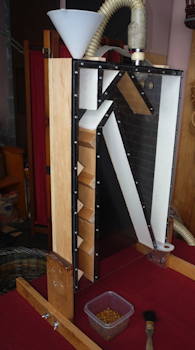
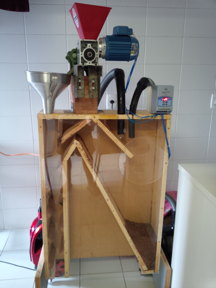
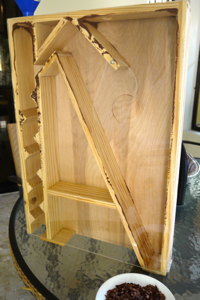
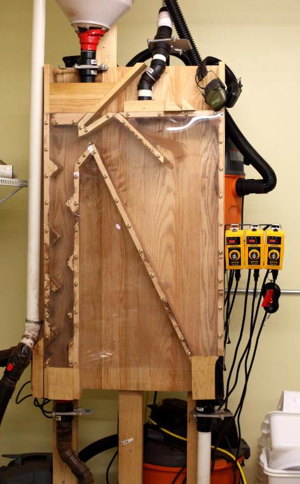
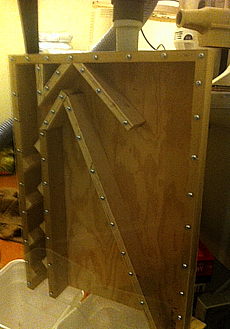
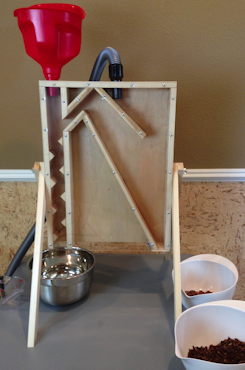
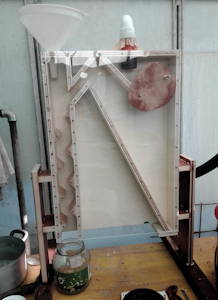
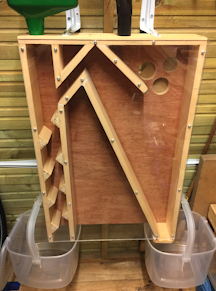
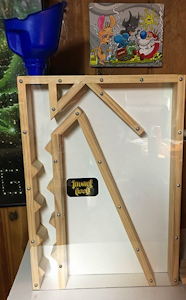
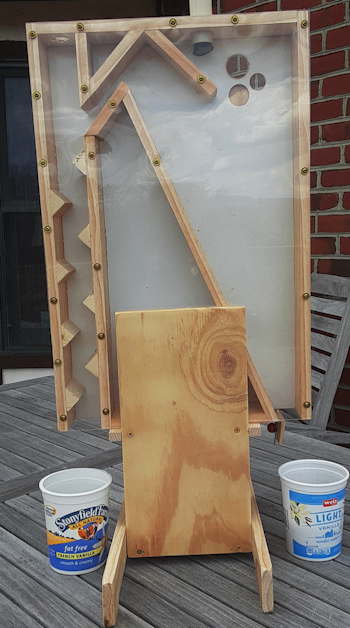
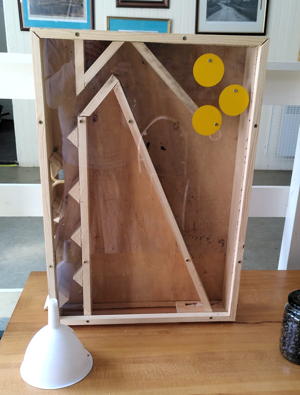
This design combines traditional zig-zag aspirator design with a 'swirl chamber' just below take-off
to allow repeated sorting of each seed as it is poured though.
Suitable for small seed (poppy, amaranth) to medium seed (squash, sunflower)
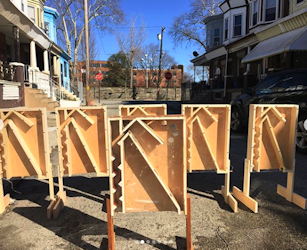
Construction cost was less than 5 GBP using scrap materials.
Using purchased materials cost would be under 50 GBP.
Remember though that this is only designed for small-scale batches: lots of a few grams to 10kg or so.
Bigger than that you'll need a different solution because the square-rule law applies - if you double the size you'd need 4 x the suction!
If you make one, please email us a picture of yours! We'll put them up here.
Seed Cleaning Machine Design by The Real Seed Collection Ltd
is licensed for public use under a
Creative Commons Attribution-NonCommercial-ShareAlike 3.0 Unported License.
Important - read the link above before you make one.
Basically you can make one for your own use,
but you have to tell people where you got the plans (including a link to us),
and can't sell copies of the machine for a profit.
You are free to adapt the plans and improve it - but the same rules then apply to the new design.
Thanks! Ben.
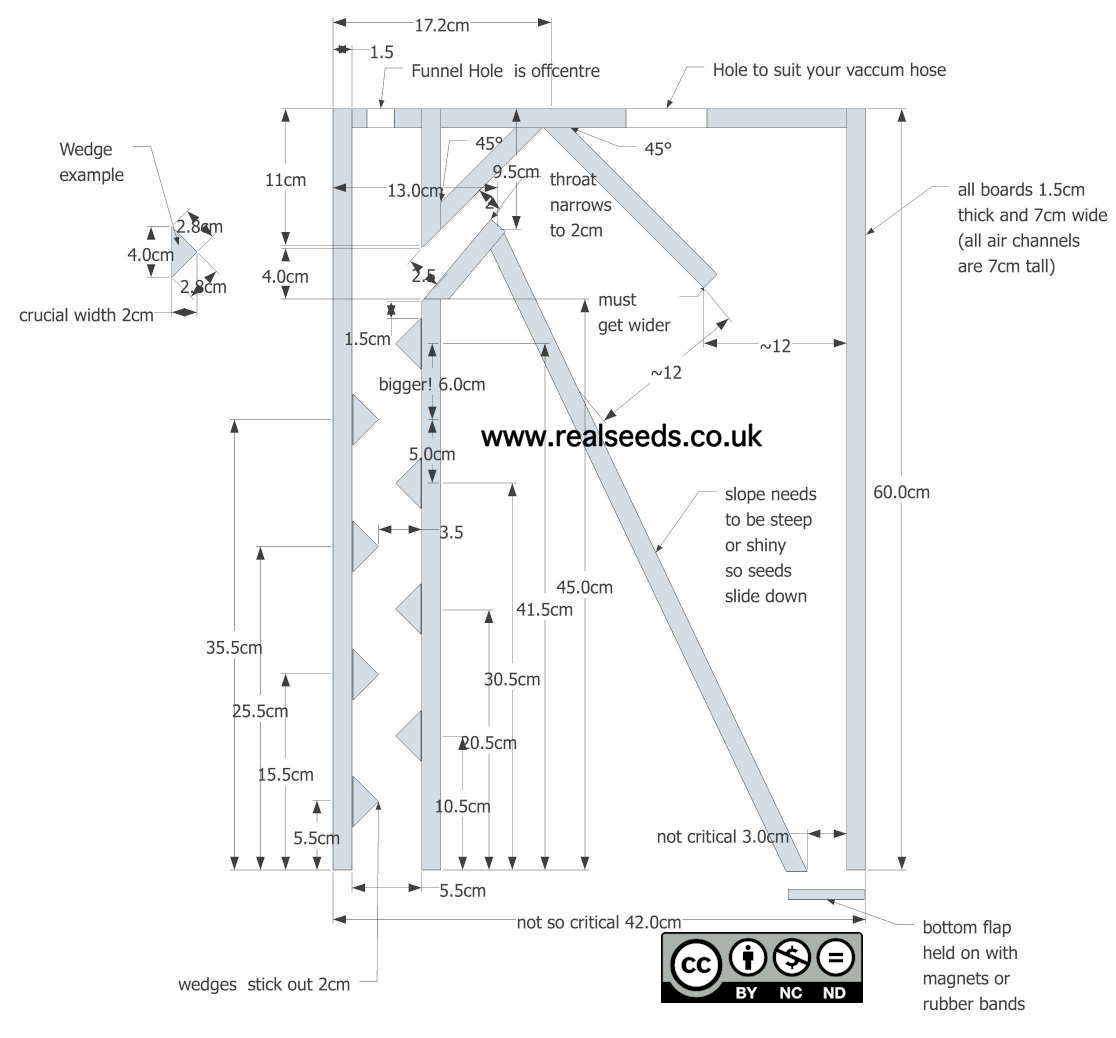
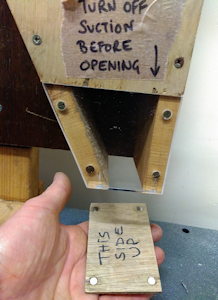
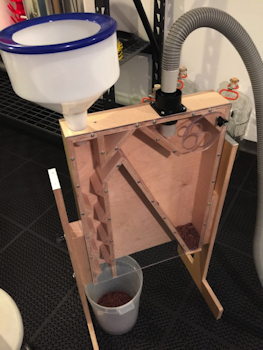
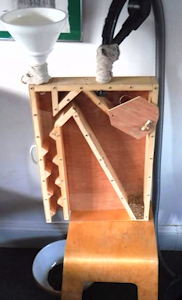
NOTE 1: The bottom right chaff emptying flap needs to be airtight or the cleaner will not work.
But it also needs to be easily removeable so you can dump out the chaff quickly - you will need to do this quite often often,
for example when you suck good seed out by mistake and want to put it through again.
Ours is held on by 4 small supermagnets glued in holes in the wood.
Matching magnets set in the body of the cleaner attract it on firmly ; if the bottom of the cleaner is smooth it is airtight.
We have a tray / tub under it this flap, so we can just pull it open and all the seed falls into the tray for recycling if needed.
NOTE2: Don't be tempted to 'improve' the plans! If you build it exactly as the plans say it will work really well.
If you change anything, it might work better, but it will probably not work at all. Once you've built one and got a feel for how it works,
then of course you can play around with the design and maybe improve it some more.
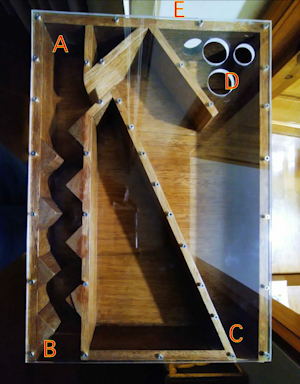
SOME EXPLANATION IN SPANISH, for those who do not speak English:
Explicación en español, por si no entendiste el video en inglés.
Lo siento porque solo hablo un poco de español. Por favor, mire la imagen de arriba.
La mezcla de semillas cae de A a B. El aire sube de B hacia A-C-D-E. El aire ascendente ejerce una fuerza hacia arriba sobre la mezcla de semillas, y el tamaño de esta fuerza depende del tamaño de las partículas. Al mismo tiempo, la gravedad ejerce una fuerza hacia abajo sobre la mezcla, y esta fuerza depende del peso de las partículas. De esta forma, las partículas de baja densidad son las más afectadas por el aire, mientras que las partículas de alta densidad son las más afectadas por la gravedad. Las partículas más ligeras se mueven hacia arriba con el aire y las partículas más densas caen hacia la salida en B.
Debe tener una placa que pueda bloquear parcial o completamente los orificios en la posición etiquetada como "D". El propósito de estos agujeros es regular la succión de aire en la máquina en la posición B. Si los agujeros están bloqueados, todo el aire debe entrar en la posición B. Si los agujeros no están bloqueados, no entrará aire en la posición B, porque es mucho más fácil que entre en D. De esta manera, la apertura de los agujeros en D controla la velocidad del aire contra la mezcla a medida que cae de A a B. La semilla y el material de desecho deben entrar en A. Si la semilla y el material de desecho salen juntos de la máquina en B, entonces no tiene suficiente succión. Debe bloquear más los agujeros en la posición D. Si tanto la semilla como el material de desecho se detienen en la posición C, entonces tiene demasiada succión. Debe abrir lentamente los agujeros en D más hasta que tenga una buena separación. Nota: La separación solo es posible si existe una diferencia de densidad entre los dos materiales. Si son de la misma densidad pero de diferentes tamaños, no es posible la separación.
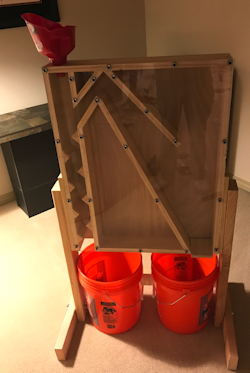
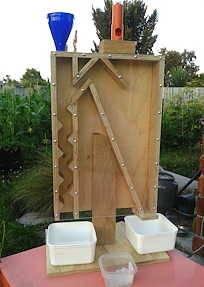
AND HERE ARE SOME THAT PEOPLE HAVE MADE FROM OUR PLANS, ALL OVER THE WORLD:
 |
Just wanted to say thank for the seed cleaner plans! I'm using it to winnow roasted coaco beans and seperate them from the husks. I did my first trial run today and it worked fantastic. |
 |
Hi! Prairie Wolfe, MPG Ranch |
 |
I found your youtube video and web page on the seed cleaner and made one up yesterday. George Adams |
 |
Good evening seed collectors, the processing of our winter wheat was greatly speeded up after I had made the seed cleaner, based on your design. A picture goes as proof. Many thanks and if you ever consider the benefit of making a handthresher ... With best regards, Paul Liebelt |
 |
I saw the video Ben did and decided to get making one straight away. I find it works best with smaller seed and sorting out the dust and chaff as well as the thinner ones. I will make a few adjustments to make it more air tight but I am very impressed and it's saved me a lot of time when it comes to cleaning seed I have saved myself. Maybe with a different powered hoover the results would allow me to clean up larger seed such as beets. - Jack |
 |
At last we have finished the seed cleaner - it was my Christmas gift. We are most grateful to you for sharing your design and for the very helpful video. The cleaner works perfectly except we have an issue with static electricity. It must be the composition of the acrylic sheet on the front. I have sprayed it with a solution of liquid fabric softener and that helps to reduce it somewhat. We added a carry handle and designed feet that fold up for storage. Think we'll make a larger funnel hole to allow for cleaning beans. I am the person who contacted you about cleaning lettuce seed. The cleaner is excellent but I wondered about the height of the first wedge. If it were just a shade lower, the seed might not bounce up and be drawn into the outlet so easily. It's hard to say, really. I look forward to experimenting with next year's seed harvest and cleaning. Thanks again - Frances note from Ben: Yes, seed bouncing up from the first wedge into the vortex can be an issue. However, while moving the first wedge down might help, I worry it could destroy the 'swirl' effect. Instead, I would suggest moving or angling the funnel to the left more, so the first thing the stream of seed impacts is the _second_ wedge, on the left. |
 |
Greetings from Sao Paulo Brazil! I just finished my seed cleaner based on your design. I use it to separate my cocoa nibs from the husks and it works fine! Losses are only 17%!! Many thanks for posting all the project in such greater details. It worked fine. I attached a picture of the cleaner. Best wishes, Andre PS: The machine you see on top is a coffee beans grinder that I use to crack the roasted cocoa beans. The beans are smaller than usual since I use native ones from the Amazon Rain Forest, which is collected by the locals from trees near their homes. There is no organised plantation! The coffee grinder manages to crack them rather well. Other crackers I used broke them too much and the recovery rate was smaller. Usually, small chocolate producers like me use the Chocolate Alchemy winnower (The Aether Winnower), which achieves a recovery rate around 80%. The Real Seeds winnower of yours gives me 83% and occupy much less space then the one from Chocolate Alchemy. On top of that it is much nicer to the eyes!! I attached a small 1/6 cv motor and speed control to the axis of the grinder to save time and increase productivity. |
 |
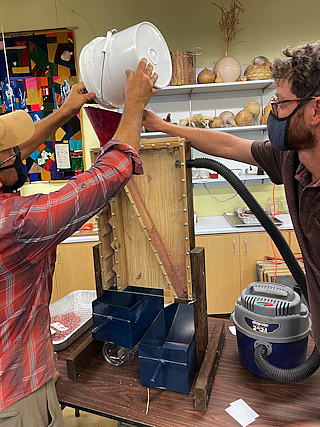
I want to thank you for the detailed plan you provided. Below is the end result after the first batch of cacao beans.
|
 |
Don't do this * This is one I spotted in a blog about Humming Bird Chocolate. Looks like its been modified with the addition of at least 2 extra vacuums to take away the debris and feed in cocoa nibs. I would suggest thinking carefully about how its going to work if doing this - you'll get 'interesting' effects of the suction in different directions! The original design assumes open air pressure at the bottom left and a closed-off collector. Stick to this unless you really understand how it works - everyone who has made one exactly to the plans has had it work; everyone who had trouble modified the plans first... Note the ear-defenders!!!
(*unless you're really, really sure you know what you're doing. . .) |
 |
Dear Ben, Just finished my first seed cleaner and wanted to send you a picture to add to your collection. I am in Uxbridge, Ontario, Canada and I am using it to separate the cocoa nib from the hulls and it seems to be working well. Can't thank you enough for posting the design online. Best regards, Erik |
 |
Hi Ben, Attached is a photo of the seed cleaner I built from your plans. I use it for cocoa beens and it works great. I am about to make a demonstration video using it. Most people who see it working just smile in amazement. Thanks so much sharing the plans. Best Regards from California, USA, Thomas Snuggs |
 |
My husband and I wish to thank you for sharing the seed cleaning plans. We asked a friend from Montreal (Alex McLean) to build one for us and the result is amazing. The seed cleaner conception is fantastic and thanks to Alex's thorough work the result is absolute perfection. |
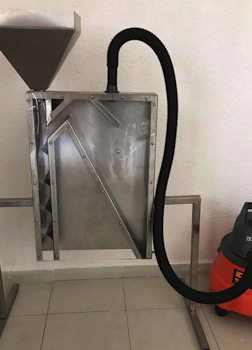 |
It seems that the seed cleaner works well for artisanal chocolate producers - after all, chocolate is a seed, and you need to sort the seed husks out from the beans. Here's Maria Madero's version from Mexico. "Thanks for sharing the winnower desing. Its very usfull for my chocolate factory in Merida Yucatan Mexico. I made it out of stainless steel. It works great! the cacao nibs are super clean!!!" |
 |
"I just wanted to say thanks for posting the design. I just finished mine last night. I spent about 6hrs on the project - I can't wait to use it." Andy Rodosevich |
|
Here's one in use at Durham University, by Dr MacGregor: "Just wanted to get in touch to thank you for the plans for the vacuum seed sorter. I had one made by the Durham University school of Engineering Mechanical Workshops this summer and I couldn't be happier with it. It is working amazingly well. Photos attached. Thank you! - Dana" |
 |
Hi, thanks for the plans on the diy seed cleaner. I made one it works well. henry gin |
 |
Hi!!! Im Mario from italian riviera! I build your machine to clean different size and shape of cactus seeds. Here the pics of the machine... Thanks for sharing the project Best regards Mario |
 |
Just a quick Thank you for supplying the detailed plans of your winnower design, it is absolutely ideal for my parrot collection. The only problem i had was finding 28mm timber to cut the triangular blocks with a mitre chop saw, still got all my fingers so all's good. Thanks again Rob & Carol Staffordshire UK |
 |
Here's one that Savant Seeds made: Special thanks to #realseeds for the share on the #blueprints for this awesome #seedseperator #seedmachine thanks for making my job a whole lot easier
|
 |
And this is a set in use by the Roughwood Seed Collection |
 |
This one made by Trill Farm who also grow seeds for us as well as their local Seed Hub . . . |
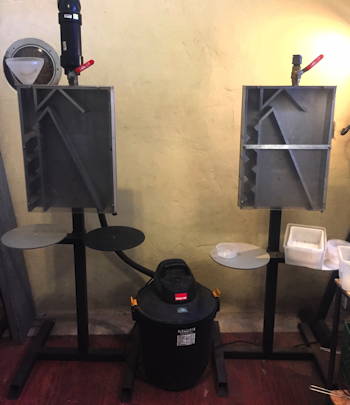 |
I have been using them for years to clean seeds from poppies up to beans. We really enjoy using a ball valve to control the airflow and it makes it quite easy to readjust between crop types. We also made the stand adjustable to fit multiple sizes of containers so that bigger bins can be used to catch clean seeds. The plexiglass front is anchored at 6 points with a flat bar across the middle to make a nice seal. The front pops off quickly and easily for cleaning. One day I would like to make a hopper that agitates and meters the seed. Love this machine! I have probably cleaned thousands of pounds of seeds over the years using these. Thank you for all your hard work and contributions to the seed community. I hope to meet you one day to thank you in person. I am very excited about the 3d printed scoops, because you are correct, finding the right scoops for the job is a headache! With highest regards, -Aaron Hawthorn Farm Organic Seeds Ben's comment: Nice build. The adjustable stand is brilliant! Your idea of using a ball valve for an adjustable suction control is pleasing, but it is strangling the suction tube from the vacuum. This may put quite a lot of strain on the motor and probably generate more noise than necessary at low suction levels. The original design avoids this by having an adjustable bypass air _inlet_ rather than adjustably strangling the suction air outlet. This means that the vacuum is in fact always sucking by exactly the same amount and never with very much resistance against it even if you have set the device to provide only a tiny bit of suction. Obviously if your set up is working for you there is no need to change it! But that's why the plan provides an adjustable extra air inlet rather than choking off the outlet. |
 |
My name is Justin, I help out with marketing and communications at Native Seeds/SEARCH located in Tucson, Arizona. We are a small nonprofit seed bank consisting of arid-adapted seed varieties native to the US Southwest and northern Mexico. |
 |
We finished building the seed cleaner yesterday and are pleased at how well it sorted the flax seeds from the chaff. Here’s a picture of the front of the cleaner. We hinged the access flap to remove the chaff. Thank you so much for posting the information and drawing and video. - Steve Henderson, USA
Ben says: note the nice stand design, the machine just slots into it and is pegged in place with a nail in a loose hole. Easy to remove for transport or storage. |
 |
Thank you for sharing the blueprints of your seed cleaning machine. I built this machine to clean flax seeds. I am glad it worked well. - Masato Okano , Kobe City, Hyogo, Japan |
 |
Here's ours for Northern Seed Sovereignty - UK - plans are excellent (thanks for sharing!) Materials, from new were around £50 and it works like a dream. It's perfect for medium scale seed production/cleaning. |